
11.3 Client/Server

Client/Server Applications
Section titled “Client/Server Applications”Developing client/server applications involves not only establishing connections but also defining how data is exchanged. While raw byte streams are suitable for simple echo services, complex data exchange necessitates structured formats and efficient serialisation.
TCP Server with std::net::TcpListener
Section titled “TCP Server with std::net::TcpListener”A TCP server in Rust is typically built using std::net::TcpListener. This type is used to bind to a local address and port, and then listen for incoming TCP connections.
The listener.incoming() method provides an iterator that yields new TcpStream instances as clients connect. Each TcpStream represents an established connection between the client and the server, allowing for bidirectional data flow.
A practical example of a simple TCP echo server, which for simplicity handles connections serially, is as follows:
use std::io::{Read, Write};use std::net::{TcpListener, TcpStream};// use std::thread; // Uncomment for multi-threaded server in production
fn handle_client(mut stream: TcpStream) {    let peer_addr = stream.peer_addr()        .map(|a| a.to_string())        .unwrap_or_else(|_| "unknown"        .to_string());    println!("Handling connection from: {}", peer_addr);
    let mut buffer = [0; 512]; // Buffer to hold incoming data.    loop {        match stream.read(&mut buffer) {            Ok(bytes_read) => {                if bytes_read == 0 { // Client gracefully disconnected.                    println!("Client {} disconnected.", peer_addr);                    break;                }                println!("Received {} bytes from {}: {}", bytes_read, peer_addr,                    String::from_utf8_lossy(&buffer[..bytes_read]));
                // Echo back the received data to the client.                if let Err(e) = stream.write_all(&buffer[..bytes_read]) {                    eprintln!("Failed to echo to {}: {}", peer_addr, e);                    break;                }            },            Err(e) => { // An error occurred during reading.                eprintln!("Error reading from {}: {}", peer_addr, e);                break;            }        }    }}
fn main() -> std::io::Result<()> {    // Bind the TcpListener to a local IP address and port.    let listener = TcpListener::bind("127.0.0.1:7878")?;    println!("TCP Echo Server listening on 127.0.0.1:7878");
    // The incoming() method yields new TcpStream instances for each accepted connection.    for stream in listener.incoming() {        match stream {            Ok(stream) => {                // In a production-ready server, a new thread or an asynchronous task                // would typically be spawned to handle each client concurrently,                // preventing the server from blocking.                // thread::spawn(move || handle_client(stream));                handle_client(stream); // In this example, connections are handled serially.            },            Err(e) => {                eprintln!("Error accepting connection: {}", e);            }        }    }    Ok(())}
We use a slight modified version of the code from the last section (Raw TCP Client) for the client — I have only changed the IP address to be loopback and to use the port 7878:
use std::io::{self, Read, Write};use std::net::TcpStream;
fn main() -> io::Result<()> {    println!("Attempting to connect to TCP echo server on 127.0.0.1:7878..");    // Establish a TCP connection to the specified address.    // This call blocks until the connection is established or an error occurs.    let mut stream = TcpStream::connect("127.0.0.1:7878")?; // Connect to echo server    println!("Connected! Sending 'Sending a message to myself!'");
    // Send data to the server. write_all ensures that all bytes    // from the slice are written to the stream, handling internal retries.    stream.write_all(b"Sending a message to myself!\n")?;    // flush ensures that any buffered data is immediately sent over the network.    stream.flush()?;
    // Receive data from the server.    let mut buffer = [0; 512]; // A buffer to store incoming data.    // read attempts to read data into the buffer and returns the number of bytes read.    let bytes_read = stream.read(&mut buffer)?;    // Convert the received bytes into a human-readable string.    let received_data = String::from_utf8_lossy(&buffer[..bytes_read]);    println!("Received from server: {}", received_data);
    Ok(())}
This server binds to a local address and enters a loop to accept incoming connections. For each connection, it calls handle_client to read data and echo it back. The example is simplified to handle connections serially, but notes that thread::spawn would be used for concurrency in a production environment.
The basic TCP server example, which uses a blocking for stream in listener.incoming() loop and handles clients serially or with simple thread spawning, is straightforward to implement but does not scale well for many concurrent connections. This highlights an important design consideration in network programming: the trade-off between implementation simplicity and the ability to handle high concurrency. While std::net is direct and easy to understand for basic blocking I/O, it quickly becomes inefficient for servers needing to manage many simultaneous clients. This naturally leads to the need for asynchronous programming, which is discussed in a later section, illustrating a direct causal relationship between application requirements (such as scalability) and the choice of Rust’s networking approach (std::net versus tokio).
Running this code
This project is a little more complex to set up than previous code. That is because we wish to have two binaries in a single project — one for the client and one for the server. VSCode supports this very well, but you have to use a slightly modified directory structure, as follows:
my_project/├── Cargo.toml└── src/ ├── main.rs ← optional, default binary └── bin/ ├── server.rs ← first executable └── client.rs ← second executableI don’t have a main.rs in my project as it is not required. So, in VSCode I run the application as follows. Please note:
- The
client.rsandserver.rsfiles are in a sub-directory ofsrccalledbin - The server is executed using the play button icon in the
server.rsfile. You can then see the server running in the terminal that appears. - The terminal is split using the split terminal function so that you can see the client running at the same time as the server.
- The client is then run from the ‘split’ terminal using the command
cargo run --bin clientso that it appears in the split terminal window. - Remember to kill the server or it cannot be run again as the server socket is in use.
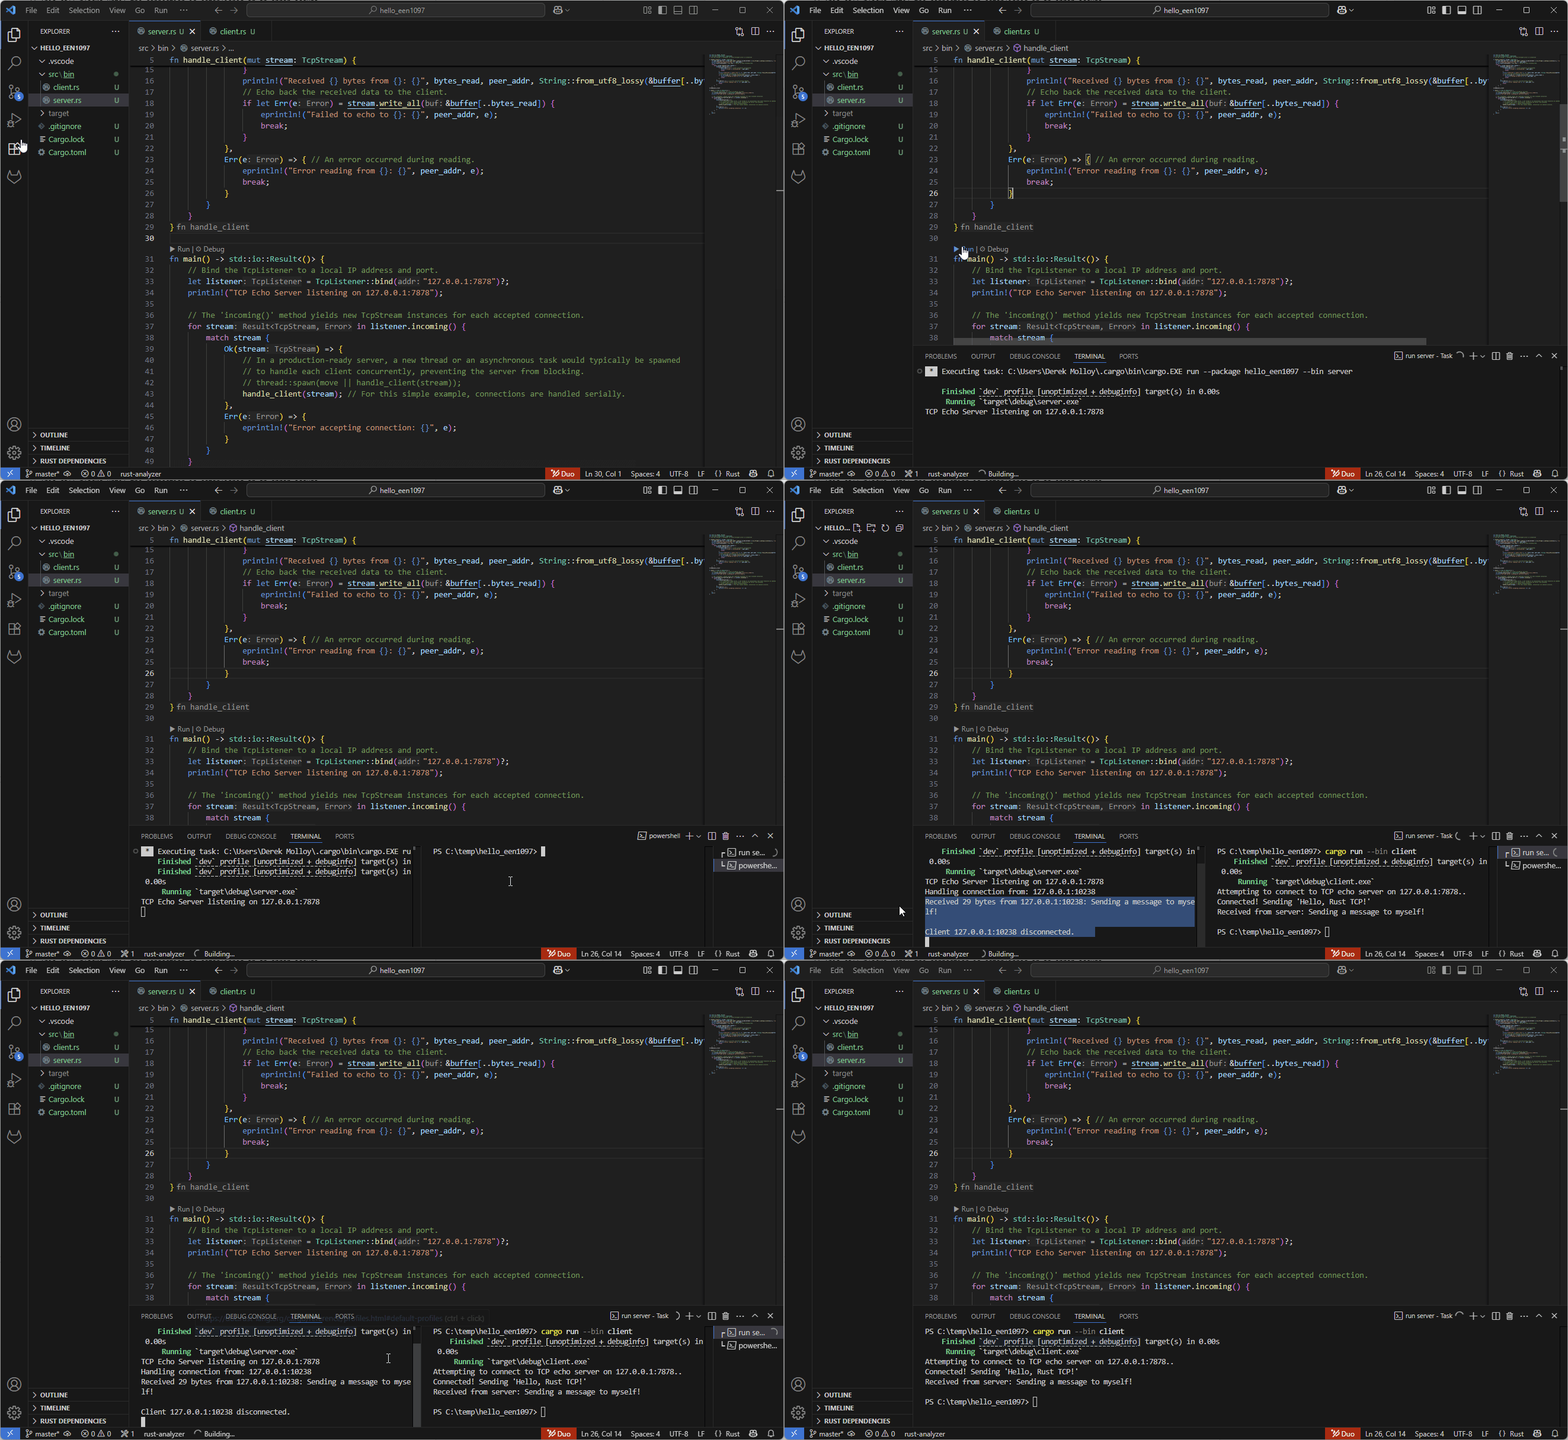
The final output from both terminals is below for clarity. The server terminal:
TCP Echo Server listening on 127.0.0.1:7878Handling connection from: 127.0.0.1:10238Received 29 bytes from 127.0.0.1:10238: Sending a message to myself!
Client 127.0.0.1:10238 disconnected.
The client terminal:
Attempting to connect to TCP echo server on 127.0.0.1:7878..Connected! Sending 'Sending a message to myself!'Received from server: Sending a message to myself!Final notes on this client/server application:
- The client port number (as seen by the server as
10238in this case ) will change each time the client is run as the operating system will allocate a new port as required. This is called an ephemeral[^4] port. - The server will remain running, listening for additional client connections on port
7878unless it is killed. Port7878cannot be used by any other service as long as the server is bound to that server socket.
Multi-threaded TCP Server
Section titled “Multi-threaded TCP Server”The serial echo server above handles one client at a time; a second connection must wait until the first disconnects. For any application serving multiple clients simultaneously, spawn a dedicated OS thread for each accepted connection using std::thread::spawn:
use std::io::{Read, Write};use std::net::{TcpListener, TcpStream};use std::thread;
fn handle_client(mut stream: TcpStream) {    let peer_addr = stream.peer_addr()        .map(|a| a.to_string())        .unwrap_or_else(|_| "unknown".to_string());    println!("Handling connection from: {}", peer_addr);    let mut buffer = [0; 512];    loop {        match stream.read(&mut buffer) {            Ok(0) => {                println!("Client {} disconnected.", peer_addr);                break;            }            Ok(n) => {                if let Err(e) = stream.write_all(&buffer[..n]) {                    eprintln!("Write error for {}: {}", peer_addr, e);                    break;                }            }            Err(e) => {                eprintln!("Read error for {}: {}", peer_addr, e);                break;            }        }    }}
fn main() -> std::io::Result<()> {    let listener = TcpListener::bind("127.0.0.1:7878")?;    println!("Multi-threaded TCP Echo Server listening on 127.0.0.1:7878");
    for stream in listener.incoming() {        match stream {            Ok(stream) => {                // `move` transfers ownership of `stream` into the new thread.                thread::spawn(move || handle_client(stream));            }            Err(e) => eprintln!("Accept error: {}", e),        }    }    Ok(())}
The move keyword transfers ownership of stream into the closure. After thread::spawn returns, the main loop immediately calls incoming().next() again — the two clients are now handled concurrently on separate threads.
UDP Client and Server with std::net::UdpSocket
Section titled “UDP Client and Server with std::net::UdpSocket”UDP communication, being connectionless, differs significantly from TCP. In Rust, std::net::UdpSocket is used to create a UDP socket. Unlike TCP, there is no explicit listen or accept phase, as UDP operates by sending and receiving individual datagrams.
Data is sent using the send_to method, which requires specifying the recipient’s address for each datagram. Data is received using recv_from, which returns both the received data and the sender’s address.
A practical example of a simple UDP echo application is as follows:
UDP Server: \
use std::net::UdpSocket;use std::io;
fn main() -> io::Result<()> { // Bind the UDP socket to a specific local address and port. let socket = UdpSocket::bind("127.0.0.1:8080")?; println!("UDP Echo Server listening on 127.0.0.1:8080"); let mut buf = [0; 512]; // Buffer for incoming datagrams. loop { // Wait to receive a datagram. This call blocks until data is received. let (bytes_received, src_addr) = socket.recv_from(&mut buf)?; let message = String::from_utf8_lossy(&buf[..bytes_received]); println!("Received '{}' from {}", message, src_addr); // Echo the received data back to the sender. socket.send_to(&buf[..bytes_received], src_addr)?; }}The UDP server binds to a port and continuously waits for incoming datagrams using recv_from. Upon receiving data, it prints the message and then echoes the same data back to the sender using send_to.
UDP Client: \
use std::net::UdpSocket;use std::io;
fn main() -> io::Result<()> {    // Bind the UDP socket to an OS-assigned ephemeral port (port 0).    let socket = UdpSocket::bind("127.0.0.1:0")?;    let server_addr = "127.0.0.1:8080"; // The address of the UDP echo server.    let message = "Hello, UDP!";    println!("Sending '{}' to {}", message, server_addr);
    // Send data to the server.    socket.send_to(message.as_bytes(), server_addr)?;
    // Receive response from the server.    let mut buf = [0; 512];    let (bytes_received, src_addr) = socket.recv_from(&mut buf)?;    let received_message = String::from_utf8_lossy(&buf[..bytes_received]);    println!("Received '{}' from {}", received_message, src_addr);
    Ok(()) // Indicate success}
While it’s common to see fn main(){} for simple Rust programs, returning io::Result<()> from main is useful when your main function might perform operations that can fail, especially those involving input/output (like reading from files, network operations, etc.). When main returns io::Result<()>, you can use the ? operator to propagate errors easily. If any operation within main returns an Err, the ? operator will automatically return that Err from main, and the program will exit with an error code. This provides a clean way to handle potential failures at the top level of your application.
The UDP client binds to an available local port, then sends a message to the server using send_to. It then waits for a response from the server using recv_from.
from_utf8_lossy is used to convert a slice of bytes (&[u8]) into a String even if the data is not guaranteed to be valid UTF-8. UDP messages are just raw bytes. When you receive data from the network, there’s no guarantee that those bytes form valid UTF-8 text. If you tried: String::from_utf8(buf[..bytes_received].to_vec())it would panic or return an Err if the bytes were not valid UTF-8. This way, your program never crashes due to invalid network data and can still display the message as best as possible.
Running this Example:
This project is almost identical to the previous example in the way that the project is structured.
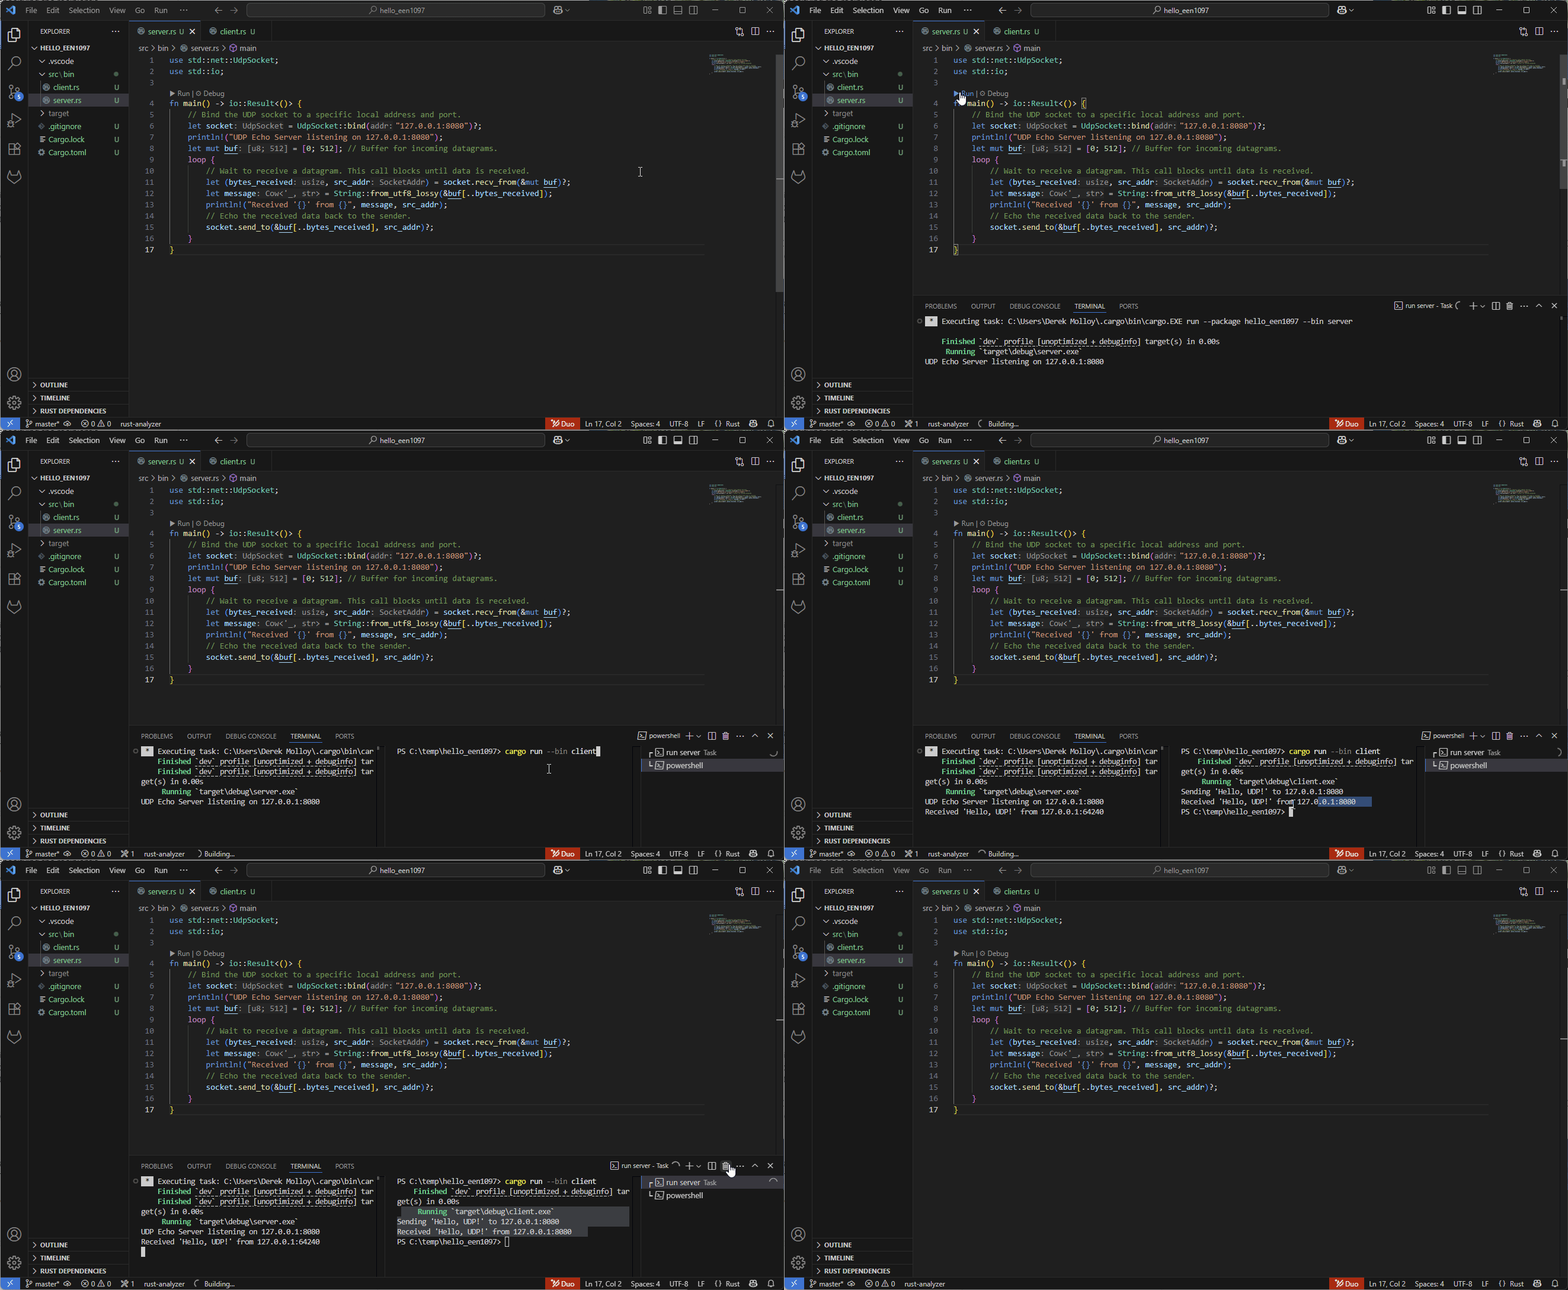
Once again, remember to kill the server or it will remain running on your machine. The final output from both terminals is below for clarity.
The server terminal (where the client was executed multiple times):
UDP Echo Server listening on 127.0.0.1:8080Received 'Hello, UDP!' from 127.0.0.1:55924Received 'Hello, UDP!' from 127.0.0.1:55459Each client terminal will have the following output:
Sending 'Hello, UDP!' to 127.0.0.1:8080Received 'Hello, UDP!' from 127.0.0.1:8080Structured Data Interchange with JSON
Section titled “Structured Data Interchange with JSON”While raw byte streams are sufficient for simple data, they become impractical for exchanging complex or variable-length messages. Structured data formats like JSON (JavaScript Object Notation) are essential for interoperability, ease of parsing, and maintainability in modern network applications.
JSON
JSON (JavaScript Object Notation) is a lightweight, text-based data format used for representing structured information. It is easy for humans to read and write, and straightforward for machines to parse and generate. Originally derived from JavaScript, JSON has since become language-independent and is now one of the most widely used formats for data exchange across the web and in APIs.
JSON structures data using two main building blocks: objects and arrays. An object is an unordered collection of key–value pairs enclosed in curly braces ({}), where keys are strings and values can be strings, numbers, booleans, null, arrays, or nested objects. For example:
{ "name": "Derek", "age": 21, "is_member": true}An array is an ordered list of values enclosed in square brackets ([]). Each item in the list can be any valid JSON value:
["EEN1097", "EEN1071", "EEN1022"]JSON is widely used because of its simplicity and compatibility. Web applications often use JSON to exchange data with servers via HTTP requests. For example, RESTful APIs commonly send responses in JSON, which client-side JavaScript can easily process. Additionally, many programming languages provide built-in libraries to parse and manipulate JSON, including Rust, Python, Java, and C++.
Despite its simplicity, JSON has some constraints: it does not support comments or trailing commas, and all keys must be quoted strings. These rules ensure consistency and reduce parsing errors, but they can surprise users expecting more flexibility. In modern software systems, JSON is used in configurations, logging, messaging between services, and even storing data in NoSQL databases like MongoDB. Its format and readability have made it critical in interoperable, platform-independent communication. Table 3: below provides some common alternatives to JSON.
Table 3: Summary of JSON alternatives
| Format | Key Features | Best For |
|---|---|---|
| XML | Verbose, supports attributes and schemas | Document-centric data, legacy systems |
| YAML | Human-readable, supports comments | Configuration files, readable structured data |
| TOML | Minimal syntax, used in Rust (Cargo.toml) | Simple, unambiguous configuration |
| MessagePack | Compact binary, JSON-compatible structure | Performance-sensitive or bandwidth-limited apps |
| Protobuf | Schema-based, efficient binary format | High-performance APIs, large-scale data exchange |
JSON and Rust
Rust’s ecosystem provides powerful tools for handling structured data, primarily through the serde and serde_json crates.
serde: This is Rust’s powerful, generic serialisation and deserialisation framework. It allows Rust data structures to be converted to and from various data formats (e.g., JSON, YAML, TOML, XML) with minimal boilerplate.serde_json: This crate specifically implements theserdeframework for the JSON data format, providing functions to serialise Rust types into JSONstrings/bytesand deserialise JSON into Rust types. To useserdeandserde_json, the following dependencies should be added toCargo.toml:
[package]name = "hello_een1097"version = "0.1.0"edition = "2024"
[dependencies]serde = { version = "1.0", features = ["derive"] }serde_json = "1.0"
The derive feature for serde is important as it enables automatic implementation of the Serialize and Deserialize traits for custom structs and enums, significantly simplifying the process. A practical example demonstrating a client sending JSON data to a server, and the server deserialising it, is as follows:
First, define a shared data structure that both the client and server will use. This structure represents the format of the JSON messages. I’m using a slightly more complex structure for this project as it is best practice. The project structure is as follows:
my_project/├── Cargo.toml├── src/│ ├── lib.rs ← declares shared modules│ ├── shared_data.rs ← shared struct and logic│ └── bin/│ ├── client.rs ← binary 1│ └── server.rs ← binary 2The shared structure is in the file src/shared_data.rs as follows:
// shared_data.rs (or can be in main.rs for simple examples)use serde::{Serialize, Deserialize};
#[derive(Serialize, Deserialize, Debug, Clone)]pub struct SensorData {    pub device_id: String,    pub temperature_c: f32,    pub humidity_percent: f32,    pub timestamp: u64,}
This SensorData struct will be used by both the client and server to represent the structured data. The # attribute is crucial for serde to automatically handle conversions to and from JSON.
To make this accessible throughout the entire project you need to create a src/lib.rs file that declares the shared modules. This simply includes one line:
pub mod shared_data;The shared structure is now available in any other Rust file in the project using the line of code: use hello_een1097::shared_data::SensorData;
To complete the example, we can now define the client:
use std::io::{self, Read, Write};use std::net::TcpStream;use serde_json;// Assuming SensorData struct is defined and available (e.g., in a shared_data module)use hello_een1097::shared_data::SensorData; // as in separate file
fn main() -> io::Result<()> {    let mut stream = TcpStream::connect("127.0.0.1:1234")?;    println!("Connected to JSON server.");
    let data = SensorData {        device_id: "ESP32-001".to_string(),        temperature_c: 21.5,        humidity_percent: 60.2,        timestamp: 1678886400, // Example timestamp    };
    // Serialise the Rust struct into a JSON string.    let json_string = serde_json::to_string(&data)?;    println!("Sending JSON: {}", json_string);
    // Send the JSON string over the TCP stream.    // A newline character is added as a simple message delimiter    // for stream-based parsing on the server.    stream.write_all(json_string.as_bytes())?;    stream.write_all(b"\n")?;    stream.flush()?;
    // Optionally, read a response from the server.    let mut buffer = [0; 512];    let bytes_read = stream.read(&mut buffer)?;    let response = String::from_utf8_lossy(&buffer[..bytes_read]);    println!("Server response: {}", response);
    Ok(())}
The client creates an instance of SensorData, serialises it to a JSON string using serde_json::to_string, and sends it over a TCP stream. A newline character is added as a simple message delimiter, which simplifies parsing on the server side.
The server code /src/bin/server.rs has the following format:
use std::io::{self, Read, Write};use std::net::{TcpListener, TcpStream};use hello_een1097::shared_data::SensorData;use serde_json;
fn handle_json_client(mut stream: TcpStream) {    let peer_addr = stream.peer_addr()        .map(|a| a.to_string())        .unwrap_or_else(|_| "unknown".to_string());    println!("Handling JSON connection from: {}", peer_addr);    let mut buffer = [0; 512];    loop {        match stream.read(&mut buffer) {            Ok(0) => {                println!("Client {} disconnected.", peer_addr);                break;            }            Ok(n) => {                let line = String::from_utf8_lossy(&buffer[..n]);                if line.trim().is_empty() {                    continue;                }                println!("Received raw JSON from {}: {}", peer_addr, line.trim());
                match serde_json::from_str::<SensorData>(&line) {                    Ok(data) => {                        println!("Deserialized data: {:?}", data);                        let response = format!(                            "ACK: Received data from {} (Temp: {}C)\n",                            data.device_id, data.temperature_c                        );                        if let Err(e) = stream.write_all(response.as_bytes()) {                            eprintln!("Failed to send ACK to {}: {}", peer_addr, e);                            break;                        }                    }                    Err(e) => {                        eprintln!("Failed to deserialize JSON from {}: {}", peer_addr, e);                        if let Err(e) = stream.write_all(b"ERROR: Invalid JSON\n") {                            eprintln!("Failed to send error to {}: {}", peer_addr, e);                            break;                        }                    }                }            }            Err(e) => {                eprintln!("Error reading from {}: {}", peer_addr, e);                break;            }        }    }}
fn main() -> io::Result<()> {    let listener = TcpListener::bind("127.0.0.1:1234")?;    println!("JSON Server listening on 127.0.0.1:1234");
    for stream in listener.incoming() {        match stream {            Ok(stream) => {                handle_json_client(stream);            }            Err(e) => {                eprintln!("Error accepting connection: {}", e);            }        }    }    Ok(())}
The main features of the server.rs code are:
- TCP server setup: Listens on
127.0.0.1:1234usingTcpListenerto accept incoming client connections. - Serial handling of connections: Accepts and handles each connection one at a time (no threading or async).
- Peer identification: Retrieves and logs the client’s IP address using
stream.peer_addr(). - Buffered reading from TCP stream: Reads up to 512 bytes from the client at a time using a fixed-size buffer.
- JSON deserialisation: Attempts to parse each received message into a
SensorDatastruct usingserde_json. - Error handling: Responds to malformed JSON with an error message; logs all I/O and parsing errors clearly.
- Acknowledgement response: Sends an ACK response to the client that includes the sensor ID and reported temperature.
- Graceful client disconnect detection: Detects when a client closes the connection (
read()returns0) and logs the event.
In this code example, Serde is used to automatically parse incoming JSON data into a Rust SensorData struct. The struct is annotated with #[derive(Serialize, Deserialize)], which enables Serde to handle the conversion between the JSON string received over the TCP stream and the strongly typed Rust struct. This allows the server to work with structured sensor data (like device_id and temperature_c) without manually parsing the JSON format. Serde simplifies and secures the process of deserialisation, catching malformed input and enforcing type correctness.
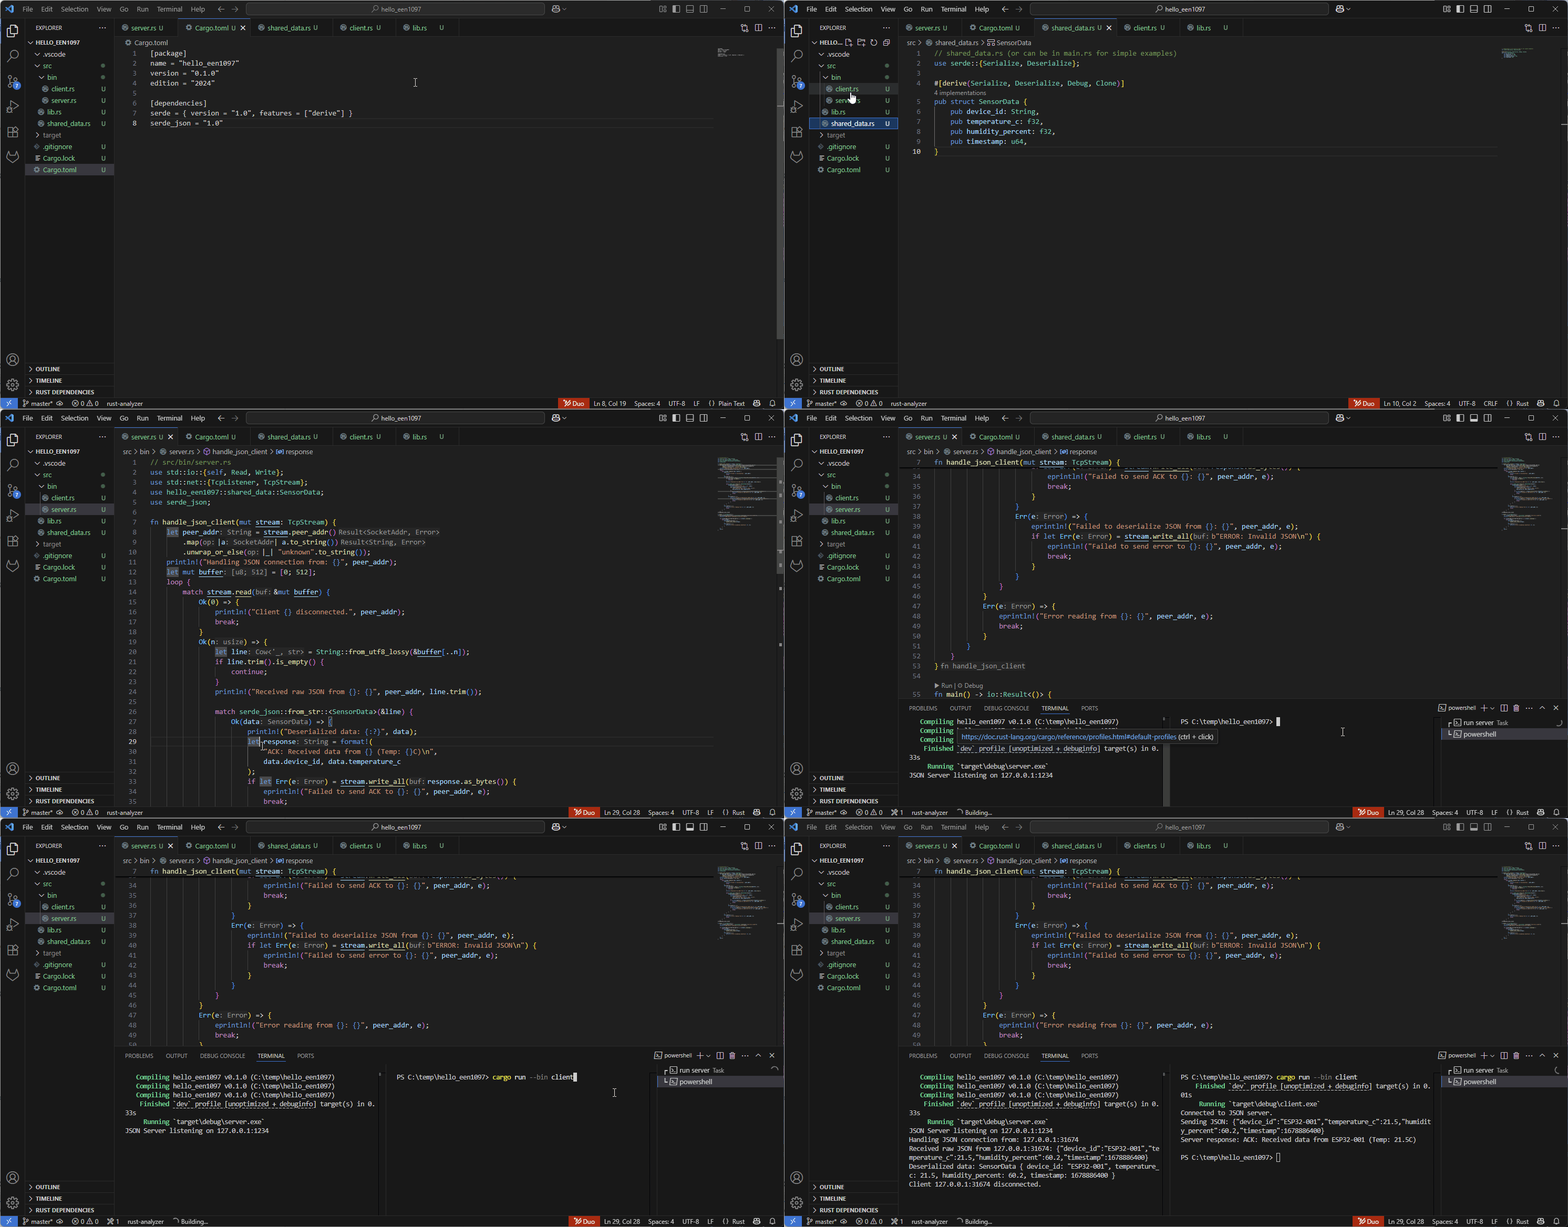
This example gives the following output for the server:
Running `target\debug\server.exe`JSON Server listening on 127.0.0.1:1234Handling JSON connection from: 127.0.0.1:31674Received raw JSON from 127.0.0.1:31674: {"device_id":"ESP32-001","temperature_c":21.5,"humidity_percent":60.2,"timestamp":1678886400}Deserialized data: SensorData { device_id: "ESP32-001", temperature_c: 21.5, humidity_percent: 60.2, timestamp: 1678886400 }Client 127.0.0.1:31674 disconnected.And for the client:
PS C:\temp\hello_een1097> cargo run --bin client    Finished `dev` profile [unoptimized + debuginfo] target(s) in 0.01s     Running `target\debug\client.exe`Connected to JSON server.Sending JSON: {"device_id":"ESP32-001","temperature_c":21.5,"humidity_percent":60.2,"timestamp":1678886400}Server response: ACK: Received data from ESP32-001 (Temp: 21.5C)
PS C:\temp\hello_een1097>
So, the ability of serde to use Serialize and Deserialize traits allows Rust structs to be converted to and from JSON in a straightforward manner. This is a core Rust design pattern that demonstrates the power of trait-based abstraction for data handling.
By simply deriving Serialize and Deserialize, developers gain robust, compile-time-checked JSON handling without needing to write extensive boilerplate code. This is a significant advantage over manual parsing or code generation approaches in other languages and directly contributes to keeping practical examples as simple as possible. It highlights how Rust’s type system and trait-based design contribute not just to safety but also to code elegance and maintainability when working with complex data formats.
Byte Order and Endianness
Section titled “Byte Order and Endianness”A multi-byte value, such as a 32-bit integer, has to be stored as a sequence of individual bytes, and there are two sensible ways to order them. Endianness is the name for that ordering:
- Big-endian stores the most significant byte first, at the lowest address, the way we write numbers on paper.
- Little-endian stores the least significant byte first.
Take the 32-bit value 0x01020304. The two conventions lay its four bytes out in opposite order:
| Byte offset | 0 | 1 | 2 | 3 |
|---|---|---|---|---|
| Big-endian | 01 | 02 | 03 | 04 |
| Little-endian | 04 | 03 | 02 | 01 |
Within a single machine this never matters, because the same CPU writes and reads the value consistently. It becomes a problem the moment that value travels between two machines that may not share the same convention. If a little-endian sender transmits its raw bytes and a big-endian receiver reads them back unchanged, the value is silently corrupted: 0x01020304 arrives as 0x04030201.
Network byte order. To remove this ambiguity, the early internet protocols, and the original BSD sockets API, fixed a single convention for multi-byte fields on the wire: big-endian, known as network byte order. The numeric fields inside IP, TCP, and UDP headers (port numbers, lengths, and so on) are all defined in big-endian, and every host converts to and from its own native order at the boundary. This is the reason the conversion functions htons/htonl (host-to-network) and ntohs/ntohl (network-to-host) are a fixture of C network code: on a big-endian host they do nothing, and on a little-endian host they swap the bytes.
Why JSON sidesteps this. Everything earlier in this section used JSON, yet byte order never came up. That is not an accident. JSON is a text format: the number 258 is sent as the three ASCII characters '2', '5', '8', and text has no byte-order question because each character is a single byte. The same is true of the other text formats in Table 3 (XML, YAML, TOML). The cost is size and parsing effort. The moment you choose a binary format for compactness (MessagePack or Protobuf from Table 3, or a custom packed protocol of your own), multi-byte fields reappear and byte order must be handled explicitly.
Handling it in Rust. Rust makes the conversion explicit and hard to get wrong, because the integer types carry the methods directly and there is no hidden platform behaviour:
let reading: u32 = 0x01020304;
// Serialise to the wire in network byte order (big-endian):let wire: [u8; 4] = reading.to_be_bytes();   // [0x01, 0x02, 0x03, 0x04]
// On the receiving side, reconstruct the value from big-endian bytes:let value = u32::from_be_bytes(wire);        // back to 0x01020304
The matching to_le_bytes/from_le_bytes exist for little-endian, and to_ne_bytes for the host’s native order (rarely what you want on a network). For richer needs, such as reading several mixed-width fields out of a buffer, the byteorder crate adds convenient read_u16::<BigEndian>()-style helpers. The habit to build is the same one the C functions enforce: decide the on-the-wire byte order once, convert at the boundary, and never transmit raw in-memory bytes in the hope that the other end agrees. Choosing a fixed-width type such as u32 rather than a type whose width is not guaranteed is what makes that conversion unambiguous in the first place.
🧩Knowledge Check
Section titled “🧩Knowledge Check”Match the Client/Server Concepts
Why does the serial TCP echo server become a bottleneck when two clients try to connect simultaneously?
A UDP client binds its socket to port 0. What does the operating system do with this binding?
What is the role of lib.rs in the JSON client/server project?
© 2026 Derek Molloy, Dublin City University. All rights reserved.