
11.4 Asynchronous I/O and Encryption

Advanced Networking: Asynchronous I/O and Encryption
Section titled “Advanced Networking: Asynchronous I/O and Encryption”For network applications requiring high performance and the ability to handle numerous concurrent connections, asynchronous I/O becomes essential. Furthermore, securing network communication through encryption is critical in modern deployments.
Asynchronous Programming with Tokio
Section titled “Asynchronous Programming with Tokio”While blocking I/O (using std::net) is relatively straightforward and suitable for low-concurrency scenarios, it does not scale efficiently for high-concurrency applications. In a blocking model, each active connection typically consumes a dedicated thread, leading to high resource consumption and limited scalability as the number of connections grows. Asynchronous I/O, on the other hand, allows a single thread to manage many concurrent operations without blocking, making it highly efficient for I/O-bound tasks like network servers and clients.
Tokio is the leading asynchronous runtime for Rust. It provides a comprehensive ecosystem of non-blocking versions of networking primitives (TcpStream, UdpSocket), along with powerful tools for task scheduling, timers, and other asynchronous utilities.
To set up a Tokio-based application, the #[tokio::main] macro is typically used as the entry point for asynchronous applications, automatically configuring the runtime.
Asynchronous TCP (tokio::net::TcpStream, TcpListener):
To use Tokio’s asynchronous TCP components, the tokio crate must be added to Cargo.toml with the full feature to include necessary modules like net, io, and time:
[package]name = "hello_een1097"version = "0.1.0"edition = "2024"
[dependencies]tokio = { version = "1", features = ["full"] } # "full" includes net, io, time, etc.
A practical example of an asynchronous TCP echo server is as follows:
Note: When you call .await in Tokio, the current async task pauses itself and returns control to the Tokio runtime. The thread is not blocked and is free to run other tasks. This happens because an async function is compiled into a state machine. When the function reaches an .await, the state machine yields back to the executor until the awaited operation is ready. Essentially, it tells the executor: “Pause me here. Wake me later when the resource is ready.”
use tokio::io::{AsyncReadExt, AsyncWriteExt}; // Traits for async read/write operationsuse tokio::net::TcpListener;use std::error::Error;
async fn handle_async_client(mut stream: tokio::net::TcpStream) ->    Result<(), Box<dyn Error>> {
    let peer_addr = stream.peer_addr()?.to_string();    println!("Handling async connection from: {}", peer_addr);    let mut buffer = [0; 512]; // Buffer for incoming data.    loop {        // Asynchronously read data from the stream.        let bytes_read = stream.read(&mut buffer).await?;        if bytes_read == 0 { // Client disconnected.            println!("Async client {} disconnected.", peer_addr);            break;        }        println!("Received {} bytes from {}: {}", bytes_read, peer_addr,            String::from_utf8_lossy(&buffer[..bytes_read]));        // Asynchronously echo back the received data.        stream.write_all(&buffer[..bytes_read]).await?;    }    Ok(())}
#[tokio::main] // Marks the main function as an async entry point, setting up the Tokio runtime.async fn main() -> Result<(), Box<dyn Error>> {    // Bind the asynchronous TcpListener to a local address and port.    let listener = TcpListener::bind("127.0.0.1:1234").await?;    println!("Asynchronous TCP Echo Server listening on 127.0.0.1:1234");
    loop {        // Asynchronously accept new incoming connections.        let (stream, _) = listener.accept().await?;        // Spawn a new asynchronous task for each client connection.        // This allows the server to handle many clients concurrently        // without blocking the main thread.        tokio::spawn(async move {            if let Err(e) = handle_async_client(stream).await {                eprintln!("Error handling client: {}", e);            }        });    }}
You can test this with the same TCP Client from earlier in this chapter:
use std::io::{self, Read, Write};use std::net::TcpStream;
fn main() -> io::Result<()> {    println!("Attempting to connect to TCP echo server on 127.0.0.1:1234..");    // Establish a TCP connection to the specified address.    // This call blocks until the connection is established or an error occurs.    let mut stream = TcpStream::connect("127.0.0.1:1234")?; // Connect to echo server    println!("Connected! Sending 'Sending a message to myself!'");
    // Send data to the server. write_all ensures that all bytes    // from the slice are written to the stream, handling internal retries.    stream.write_all(b"Sending a message to myself!\n")?;    // flush ensures that any buffered data is immediately sent over the network.    stream.flush()?;
    // Receive data from the server.    let mut buffer = [0; 512]; // A buffer to store incoming data.    // read attempts to read data into the buffer and returns the number of bytes read.    let bytes_read = stream.read(&mut buffer)?;    // Convert the received bytes into a human-readable string.    let received_data = String::from_utf8_lossy(&buffer[..bytes_read]);    println!("Received from server: {}", received_data);
    Ok(())}
Giving the following output:
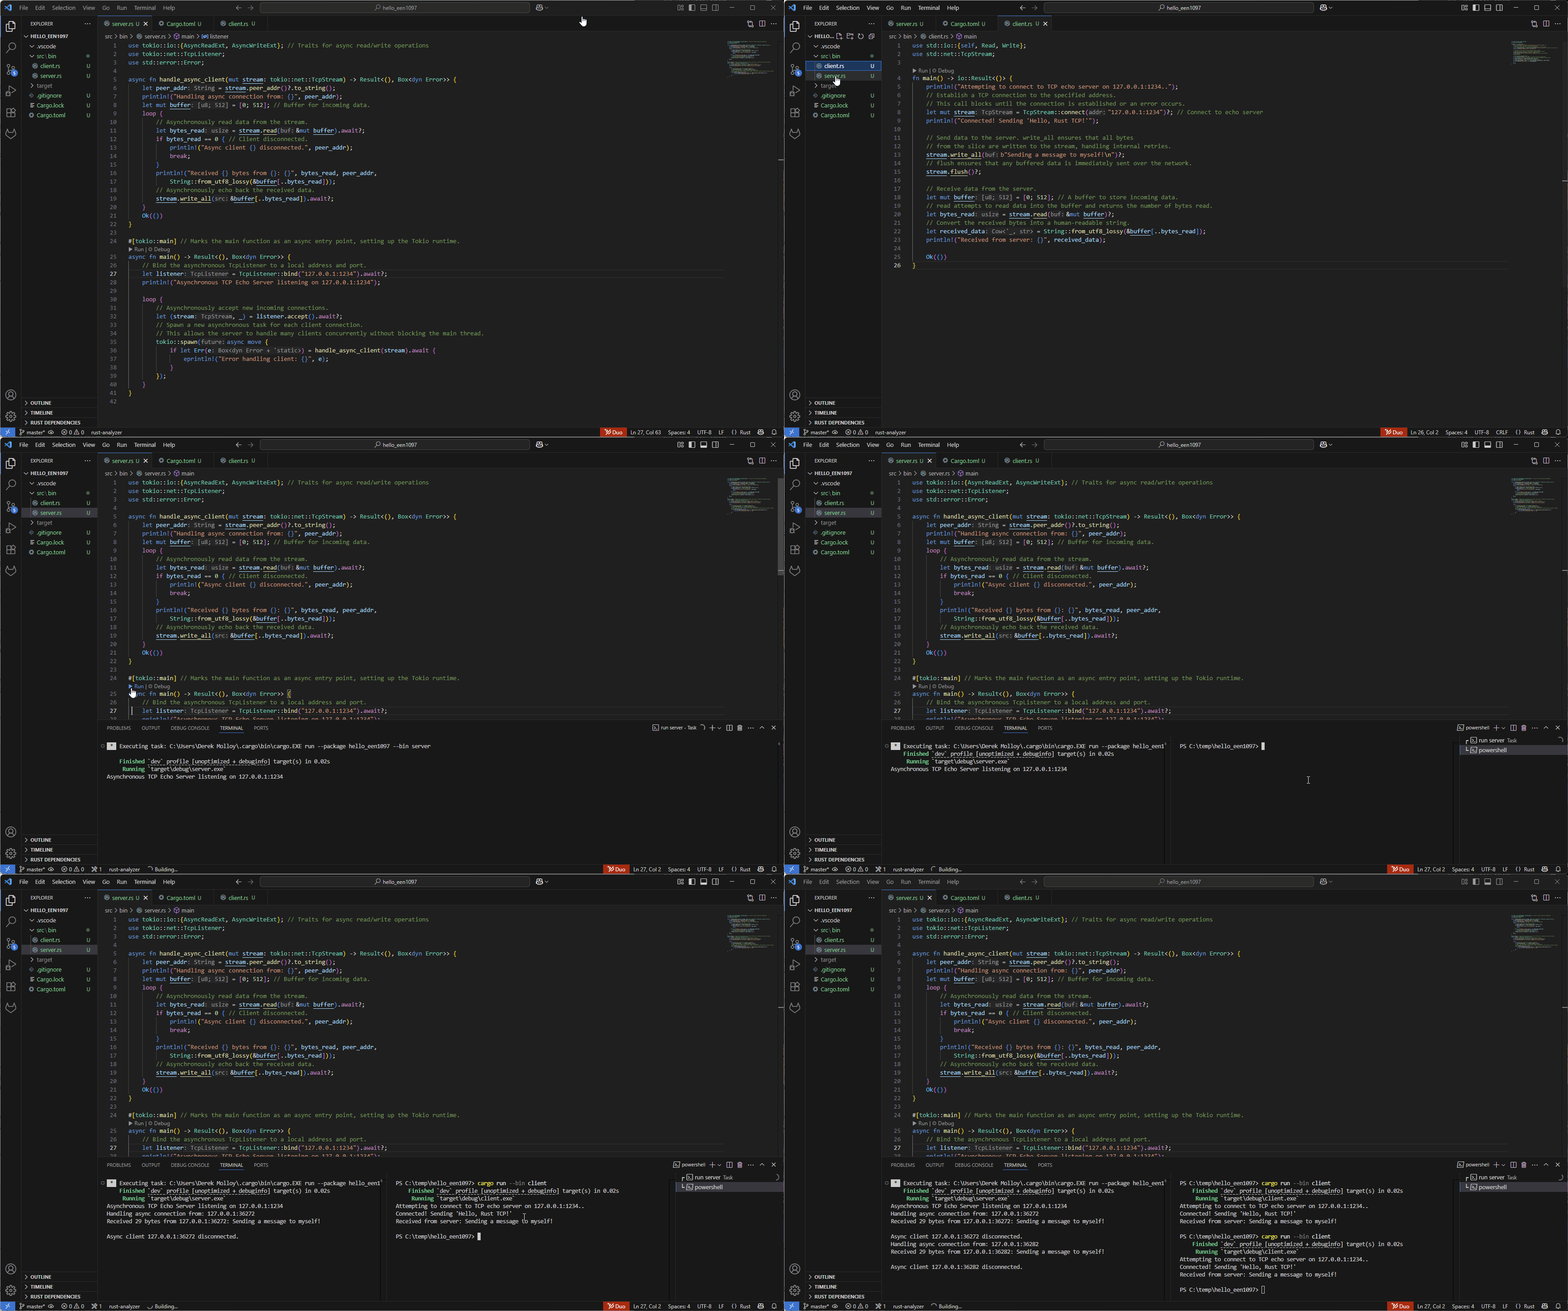
This server uses tokio::net::TcpListener and tokio::net::TcpStream. Each incoming connection is spawned into a new Tokio task (tokio::spawn), allowing the server to handle many clients concurrently without blocking the main thread. The await keyword pauses the current task until the I/O operation completes, freeing the thread to work on other tasks.
Asynchronous UDP (tokio::net::UdpSocket):
Tokio also provides an asynchronous UdpSocket for non-blocking UDP communication.
use tokio::net::UdpSocket;use std::io;
#[tokio::main]async fn main() -> io::Result<()> {    // Bind the asynchronous UdpSocket to a local address and port.    let socket = UdpSocket::bind("127.0.0.1:8081").await?;    println!("Asynchronous UDP Echo Server listening on 127.0.0.1:8081");    let mut buf = [0; 1024]; // Buffer for incoming datagrams.    loop {        // Asynchronously receive a datagram.        let (len, addr) = socket.recv_from(&mut buf).await?;        println!("Received {} bytes from {}: {}", len, addr,                 String::from_utf8_lossy(&buf[..len]));        // Asynchronously send the datagram back to the sender.        socket.send_to(&buf[..len], addr).await?;    }}
This demonstrates an asynchronous UDP server using tokio::net::UdpSocket, which provides async versions of recv_from and send_to, allowing for efficient handling of multiple UDP clients.
Table 3: summarises the comparison between blocking std::net and asynchronous tokio::net for TCP/UDP
| Feature | std::net (Blocking) | tokio::net (Asynchronous) |
|---|---|---|
| Concurrency Model | Blocking I/O (typically one thread per connection) | Non-blocking, Event-driven (single thread can manage many tasks) |
| Best For | Simple use cases, low traffic, scripts | High concurrency, I/O-bound tasks (e.g., web servers, chat apps) |
| Complexity | Easier to write and debug for simple flows | Higher, requires understanding async runtime, Futures, async/await |
| Libraries/Crates | std::net | tokio, async-std, hyper |
| Scalability | Limited by threads or processes; resource-intensive for many connections | Scales well with async runtimes; efficient use of system resources |
| Error Handling | Straightforward, but runtime errors can lead to blocking/panics | Compile-time safety with Future and Result types; non-blocking error propagation |
The transition from std::net to tokio::net represents a fundamental shift from blocking, thread-per-connection models to non-blocking, event-driven concurrency. This is a critical aspect for modern network application development. For edge devices, while simple tasks might suffice with std::net, any ambition towards higher throughput, lower latency, or managing many simultaneous connections (e.g., an IoT gateway handling hundreds of sensors) necessitates asynchronous programming. Tokio enables this by making efficient use of system resources (fewer threads, more concurrent tasks), which is vital for resource-constrained embedded systems. It indicates that mastery of Tokio is essential for building truly capable networked edge applications in Rust.
Encryption with TLS/SSL
Section titled “Encryption with TLS/SSL”The importance of TLS (Transport Layer Security), the successor to SSL (Secure Sockets Layer), cannot be overstated in modern network applications. TLS is a cryptographic protocol designed to provide secure communication over a computer network, ensuring data privacy, integrity, and authentication. This is vital for protecting sensitive information exchanged over the internet, such as credentials or sensor data, and is the foundation for secure web traffic (HTTPS).
Rust’s ecosystem offers robust and secure TLS implementations:
rustls: This is a pure-Rust, modern TLS implementation. Its advantages include high portability (as it has no system dependencies), a secure-by-design philosophy (focusing on modern cryptographic practices), and often superior performance in benchmark tests. A potential drawback is that it requires manual certificate management.native-tls: This crate provides an abstraction layer over system-native TLS implementations. It leverages SChannel[^5] on Windows, Secure Transport on macOS, and OpenSSL on Linux. Its benefits include seamless integration with the operating system’s certificate store and automatic certificate management. However, its behaviour can be OS-dependent, and setup (particularly under Linux) can sometimes be more complex.

Figure 2. Effort (Work Chronicles)
When choosing between rustls and native-tls, developers must consider their specific needs. rustls is often preferred for embedded systems due to its pure-Rust nature, explicit control over TLS settings, and consistent behaviour across platforms, which are critical for resource-constrained and diverse environments. native-tls might be more convenient for desktop applications due to its OS integration.
A practical example of a simple HTTPS client using reqwest demonstrates how TLS is implicitly handled. To enable rustls with reqwest, the Cargo.toml should specify the rustls-tls feature:
[package]name = "hello_een1097"version = "0.1.0"edition = "2024"
[dependencies]reqwest = { version = "0.12", features = ["json", "rustls-tls"] } # or "native-tls" for system-native TLStokio = { version = "1", features = ["full"] }
reqwest simplifies HTTPS by integrating these TLS implementations, allowing developers to focus on the application logic rather than the complexities of the TLS handshake.
Asynchronous HTTPS GET Example (client.rs):
use std::error::Error;
#[tokio::main]async fn main() -> Result<(), Box<dyn Error>> {    let url = "https://www.google.com"; // Use HTTPS for secure communication.    println!("Fetching content securely from: {}", url);    // reqwest automatically handles the TLS handshake and encryption    // when an HTTPS URL is provided.    let response = reqwest::get(url).await?;
    println!("Status: {}", response.status());    let response_body = response.text().await?;    println!("--- Secure Page Content (First 500 characters) ---");    // Print only the first 500 characters of the response body for brevity.    // chars().take(500) is used instead of a byte-index slice, which would    // panic if byte 500 falls in the middle of a multi-byte UTF-8 character.    let preview: String = response_body.chars().take(500).collect();    println!("{}...", preview);
Ok(())}This example is very similar to the HTTP client example from earlier in this chapter, but by simply using an https:// URL, reqwest automatically handles the underlying TLS handshake and encryption, demonstrating the ease of secure communication in Rust. When run you get an output like the following:
Fetching content securely from: https://www.google.comStatus: 200 OK--- Secure Page Content (First 500 characters) ---<!doctype html><html itemscope="" itemtype="http://schema.org/WebPage" lang="en-IE"><head><meta content="text/html; charset=UTF-8" http-equiv="Content-Type"><meta content="/images/branding/googleg/1x/googleg_standard_color_128dp.png" itemprop="image"><title>Google</title><script nonce="tLhqgKhlc4V24U831FA6Lw">(function(){...The availability of robust, secure-by-default TLS crates like rustls (pure Rust) and native-tls (platform-integrated) indicates a strong emphasis on security within the Rust ecosystem. Unlike some older languages where TLS integration might be an afterthought or complex to implement securely, Rust’s design philosophy and ecosystem promote security from the outset. This is particularly critical for edge devices, which are often deployed in potentially insecure environments and are common targets for cyberattacks. This approach empowers developers to build secure networked applications more easily and with higher confidence, representing a significant advantage for IoT and embedded systems.
Common IoT Application Protocols
Section titled “Common IoT Application Protocols”Beyond raw TCP and UDP, edge applications typically communicate using higher-level application protocols designed for the specific constraints of IoT networks. Understanding these four protocols is essential context for the knowledge test and for designing real-world edge systems.
HTTP / HTTPS
HTTP underpins the web and most REST APIs. When an edge device calls a cloud service, retrieves remote configuration, or downloads a firmware update, it uses HTTP or HTTPS. The reqwest crate covered earlier in this chapter is the standard Rust HTTP client; adding the rustls-tls Cargo feature (shown above) makes all traffic encrypted.
MQTT (Message Queuing Telemetry Transport)
MQTT is a lightweight publish-subscribe protocol designed for devices with limited bandwidth and unreliable connections. An edge sensor publishes a reading to a named topic (e.g., sensors/ESP32-A1/temperature) on a central broker. Any number of dashboards or processing services subscribe to that topic and receive readings as they arrive — without the sensor knowing who its consumers are. A single published message can reach zero, one, or thousands of subscribers simultaneously. MQTT runs over TCP (port 1883, or 8883 for TLS) and is the dominant protocol for IoT telemetry. The rumqttc crate provides an async Rust MQTT client.
WebSocket
WebSocket upgrades an HTTP connection into a persistent, full-duplex channel. Unlike HTTP’s request-response pattern, the server can push data to the client at any time without the client polling. This makes WebSocket ideal for live dashboards that display real-time sensor readings. The tokio-tungstenite crate provides async WebSocket support built on Tokio.
CoAP (Constrained Application Protocol)
CoAP is designed for severely resource-constrained devices such as 8-bit microcontrollers with kilobytes of RAM. It mirrors HTTP’s resource model (GET, POST, PUT, DELETE) but runs over UDP rather than TCP, has a much smaller packet header, and supports multicast for device discovery. CoAP is commonly used in mesh sensor networks and LoRaWAN deployments. The coap-lite crate provides Rust CoAP support.
| Protocol | Transport | Pattern | Rust Crate | Best for |
|---|---|---|---|---|
| HTTP/HTTPS | TCP | Request-Response | reqwest | REST APIs, firmware updates, web services |
| MQTT | TCP | Publish-Subscribe | rumqttc | IoT telemetry, low-bandwidth sensors |
| WebSocket | TCP (upgraded) | Full-duplex push | tokio-tungstenite | Live dashboards, real-time control |
| CoAP | UDP | Request-Response | coap-lite | Ultra-constrained MCUs, LoRa meshes |
Rust Network Applications on ESP32 Devices — (For information only)
Section titled “Rust Network Applications on ESP32 Devices — (For information only)”Applying network programming concepts to embedded devices like the ESP32 introduces specific considerations related to hardware interaction, operating system abstractions, and resource management. Rust’s ecosystem for ESP32 development provides robust solutions for these challenges.
ESP32 Development Ecosystem for Rust
Section titled “ESP32 Development Ecosystem for Rust”The ESP32 development ecosystem for Rust offers two main approaches: std and no-std.
no-std(Bare-metal): This approach involves not linking the Rust standard library, providing maximum control over the hardware but requiring manual handling of low-level details such as memory allocation, panic handling, and peripheral access. It is typically reserved for highly constrained or bare-metal systems where every byte and cycle is critical.std(ESP-IDF based): For ESP32, the std approach is often preferred, leveraging the ESP-IDF (Espressif IoT Development Framework). This framework, primarily written in C, provides a real-time operating system (FreeRTOS), comprehensive Wi-Fi and Bluetooth stacks, and a rich set of networking libraries. Rust interacts with this underlying C framework via the Foreign Function Interface (FFI), offering a more familiar development experience for those used to higher-level Rust programming.
Key crates facilitating std ESP32 development in Rust include:
esp-idf-sys: This crate provides raw, often unsafe, Rust bindings directly to the underlying C ESP-IDF APIs. It serves as the bridge to the low-level functionalities of the ESP-IDF.esp-idf-hal: Building upon esp-idf-sys, this crate offers safe Rust wrappers around ESP-IDF’s hardware abstraction layer (HAL) for peripherals like GPIO, SPI, and I2C. It implements embedded-hal traits, providing a consistent interface for hardware interactions.esp-idf-svc: Crucially for networking, this crate provides type-safe Rust wrappers for essential ESP-IDF services. These include Wi-Fi, networking (HTTP client/server), and logging. It allows developers to utilise the standard Rust std::net APIs for TCP and UDP sockets directly, bridging them to the underlying ESP-IDF network stack (lwIP).
Building and flashing Rust code to ESP32 devices is streamlined by tools like cargo-espflash, which automates the process of compiling for the target architecture and deploying the binary to the device.
Table 4: A summary of the key esp-idf-svc modules relevant for networking on ESP32:
| Module | Functionality |
|---|---|
| wifi | Comprehensive Wi-Fi support, including connection management, configuration (SSID, password), and network scanning. |
| netif | Provides network abstraction, bridging Rust’s std::net to the ESP-IDF’s underlying network interfaces (lwIP). |
| http | Offers HTTP client and server functionalities, simplifying web interactions on the device. |
| tls | Provides a type-safe abstraction for ESP-TLS, enabling secure communication (HTTPS). |
| log | Integrates logging capabilities, crucial for debugging and monitoring embedded applications. |
Wi-Fi Configuration on ESP32
Section titled “Wi-Fi Configuration on ESP32”Connecting an ESP32 device to a Wi-Fi network is the first critical step for most networked applications. The esp-idf-svc crate simplifies this process by providing high-level abstractions over the ESP-IDF Wi-Fi driver.
The key steps are:
- Initialising the ESP-IDF system event loop (EspSystemEventLoop) and Non-Volatile Storage (NVS), which are required for system events and persistent configuration.
- Obtaining the modem peripheral from the device’s hardware peripherals.
- Creating an EspWifi instance, which wraps the Wi-Fi driver.
- Setting the Wi-Fi configuration, including the SSID (network name) and password.
- Starting the Wi-Fi driver, connecting to the configured network, and waiting for the network interface to be fully operational and obtain an IP address.
A simplified example function illustrating Wi-Fi setup, based on the esp-idf-svc examples:
// Simplified Wi-Fi setup (from esp-idf-svc/examples/tcp.rs)use esp_idf_svc::eventloop::*;use esp_idf_svc::hal::prelude::Peripherals;use esp_idf_svc::nvs::*;use esp_idf_svc::wifi::*;use log::info; // For logging connection status
// Network credentials, typically read from environment variables or a configuration file.const SSID: &str = env!("WIFI_SSID");const PASSWORD: &str = env!("WIFI_PASS");
fn wifi_create() -> Result<EspWifi<'static>, esp_idf_svc::sys::EspError> {    // Take ownership of the system event loop and NVS partition.    let sys_loop = EspSystemEventLoop::take()?;    let nvs = EspDefaultNvsPartition::take()?;    let peripherals = Peripherals::take()?; // Access to the modem peripheral.
    // Create an EspWifi instance, binding the Wi-Fi driver to the network interfaces.    let mut esp_wifi = EspWifi::new(        peripherals.modem,        sys_loop.clone(),        Some(nvs.clone())    )?;
    // Wrap the EspWifi in a BlockingWifi for synchronous operations.    let mut wifi = BlockingWifi::wrap(&mut esp_wifi, sys_loop.clone())?;
    // Set the Wi-Fi configuration for client mode.    wifi.set_configuration(&Configuration::Client(ClientConfiguration {        ssid: SSID.try_into().unwrap(), // Convert SSID to a byte array.        password: PASSWORD.try_into().unwrap(), // Convert password to a byte array.       ..Default::default() // Use default values for other configuration options.    }))?;
    wifi.start()?; // Start the Wi-Fi driver.    info!("Wifi started");    wifi.connect()?; // Connect to the configured Wi-Fi network.    info!("Wifi connected");    wifi.wait_netif_up()?; // Wait until the network interface is up and has an IP address.    info!("Wifi netif up");
    Ok(esp_wifi) // Return the EspWifi instance.}
TCP/UDP on ESP32
Section titled “TCP/UDP on ESP32”Once the Wi-Fi is configured and the network interface is operational, the standard Rust std::net APIs (TcpStream, TcpListener, UdpSocket) can be used directly on the ESP32. This is possible because esp-idf-svc bridges these standard library types to the underlying ESP-IDF network stack (lwIP), providing a consistent programming interface.
A practical example of an ESP32 acting as a TCP client (from esp-idf-svc):
// From esp-idf-svc/examples/tcp.rsuse std::io::{self, Read, Write};use std::net::TcpStream;use log::info;
fn tcp_client_esp32() -> Result<(), io::Error> {    info!("About to open a TCP connection to one.one.one.one port 80");    // Connect to a public DNS server's HTTP port (Cloudflare DNS).    let mut stream = TcpStream::connect("one.one.one.one:80")?;    // Send a simple HTTP GET request.    stream.write_all("GET / HTTP/1.0\n\n".as_bytes())?;
    let mut result = Vec::new();    // Read the full response from the server.    stream.read_to_end(&mut result)?;    info!(        "1.1.1.1 returned:\n====== ===\n{}\n======\nSince it returned something, all is OK",        std::str::from_utf8(&result).map_err(|_| io::ErrorKind::InvalidData)?    );    Ok(())}
This example shows an ESP32 acting as a TCP client, connecting to 1.1.1.1 (Cloudflare DNS) on port 80 and making a basic HTTP GET request. This demonstrates that standard Rust TcpStream works directly on the ESP32 after Wi-Fi setup, allowing the device to interact with internet services.
HTTP Client on ESP32
Section titled “HTTP Client on ESP32”For more robust and feature-rich HTTP client functionality on ESP32, esp-idf-svc provides EspHttpClient. This type implements the embedded-svc::http::client::Client trait, offering methods for common HTTP request methods like GET and POST, and handling HTTP-specific nuances. The underlying ESP-IDF HTTP client also supports persistent connections and HTTPS (using mbedTLS), which is crucial for secure and efficient web interactions.
A conceptual example outlining how to use EspHttpClient to perform an HTTP GET request on the ESP32 (note conceptual!!):
use esp_idf_svc::http::client::{EspHttpClient, EspHttpClientTypes};use embedded_svc::http::client::Client;use embedded_svc::http::Method;use std::io::Read; // For reading the response bodyuse log::{info, error};
// Assuming Wi-Fi is already connected via wifi_create() function from above.// The EspHttpClient API is blocking, so this is a plain (non-async) function.fn esp32_http_get() -> Result<(), anyhow::Error> {    // Create a new HTTP client with default configuration.    let mut client = EspHttpClient::new_default()?;    let url = "http://example.com"; // Can be "https://example.com" for secure comms
    info!("Making HTTP GET request to {}", url);    // Create an HTTP GET request for the specified URL.    let request = client.request(Method::Get, url, &[])?; // &[] = empty headers slice    // Submit the request and obtain the response.    let mut response = request.submit()?;
    let status_code = response.status();    info!("HTTP Status: {}", status_code);
    let mut body = Vec::new();    // Read the entire response body into a vector.    response.read_to_end(&mut body)?;    info!("Response body ({} bytes):\n{}", body.len(), String::from_utf8_lossy(&body));
    Ok(())}
This outlines how to use EspHttpClient to perform an HTTP GET request on the ESP32, demonstrating the higher-level abstraction and integrated features compared to raw TCP socket programming.
The fact that the esp-idf-svc crate allows developers to use familiar std::net APIs and higher-level reqwest style abstractions on the ESP32, which traditionally requires C/C++ and highly specific embedded APIs, is a significant development. This effectively brings a “standard library” development experience to embedded systems. This reduces the learning curve for developers accustomed to desktop or server-side Rust. It suggests that Rust is not just possible on ESP32, but it can be productive and familiar, making it a highly attractive option for IoT and edge device development where rapid prototyping and reliable code are crucial.
Last Words… Network Programming with Rust
Section titled “Last Words… Network Programming with Rust”Rust presents a capable solution for developing network applications on edge devices, offering a unique blend of safety, performance, and developer experience that addresses critical challenges in this domain. Its compile-time memory safety guarantees eliminate entire classes of bugs common in C and C++, leading to more reliable and secure deployments, which is important for devices operating autonomously in potentially vulnerable environments. Coupled with its performance characteristics that rival C/C++, Rust is inherently well-suited for resource-constrained network-attached embedded systems.
The Rust standard library’s std::net module provides robust primitives for blocking TCP and UDP communication, forming the foundational layer for network interactions. For more complex tasks, the rich ecosystem of community-driven crates, such as dns-lookup for explicit DNS operations and serde_json for structured data interchange using JSON, enhances developer productivity. These crates abstract away low-level complexities, allowing developers to focus on application logic rather than intricate protocol details.
For high-performance, scalable network services capable of handling numerous concurrent connections, asynchronous runtimes like Tokio are useful. Tokio transforms the concurrency model from blocking, thread-per-connection paradigms to efficient, non-blocking, event-driven architectures. This shift is vital for IoT gateways and other edge devices that must manage many simultaneous clients without exhausting limited system resources. Furthermore, the availability of robust TLS/SSL implementations, notably rustls (a pure-Rust solution) and native-tls (platform-integrated), ensures that secure communication is possible, enabling the development of trustworthy networked applications from the outset.
For ESP32 development, the esp-idf-svc crate provides a useful std environment. This abstraction layer allows developers to leverage familiar Rust networking APIs and high-level abstractions directly on the microcontroller, effectively bridging the gap between high-level Rust development and embedded hardware. This capability significantly lowers the barrier to entry, making Rust a highly attractive and productive choice for IoT and edge device development.
The growing adoption of Rust in embedded and IoT sectors, supported by dedicated community efforts like esp-rs, indicates its potential to become a dominant language in this space. Its unique blend of safety, performance, and a productive developer experience positions Rust as a leading contender for building the next generation of reliable, efficient, and secure networked edge applications.
🧩Knowledge Check
Section titled “🧩Knowledge Check”Match the Advanced Networking Concepts
In the async TCP echo server, why is tokio::spawn used for each accepted connection rather than calling handle_async_client directly?
What is the key advantage of rustls over native-tls for embedded and cross-platform edge deployments?
The ESP32 Wi-Fi example uses the env! macro to read the WIFI_SSID at build time. Why is this preferred over placing the SSID directly as a string literal in the source code?
© 2026 Derek Molloy, Dublin City University. All rights reserved.